
What it does
- Generate G-code creates the NC program file for the selected post-processor.
- Print Shop PDF creates an A4 landscape setup sheet: machine data, WCS, stock, tool sequence, operation sequence, estimated time, and a pre-run checklist.
Where to find it
Output › NC program › Post / G-code / Shop PDF

Steps
- Check the job with Simulate first.
- Click G-code and choose a file name in the Export G-code window (default
part.nc). When it finishes you see Wrote N lines to …. - Click Shop PDF and choose a file name (default
<job name>_Shop_Setup.pdf).
| Shop PDF contents | Details |
|---|---|
| Setup table | Machine, Class, Post, WCS, Origin XYZ, Units, Stock, Total time |
| Tool loading sequence | Seq, Station, Offset, Tool, Cutter / Insert, Type, Holder / Arbor, Stickout, RPM, Feed, Coolant |
| Machining operation sequence | Seq, Operation, Strategy, Station, Tool, Geometry, Pass / Cut, RPM, Feed, Est. time |
| Operator pre-run checklist | Checks to make before running the machine |
Note: G-code and Shop PDF generation run the same setup checks as Simulate. Always verify offsets and clearances at the machine (Verify all offsets and clearances at the machine.).
Try it: Post a camera quick-release plate
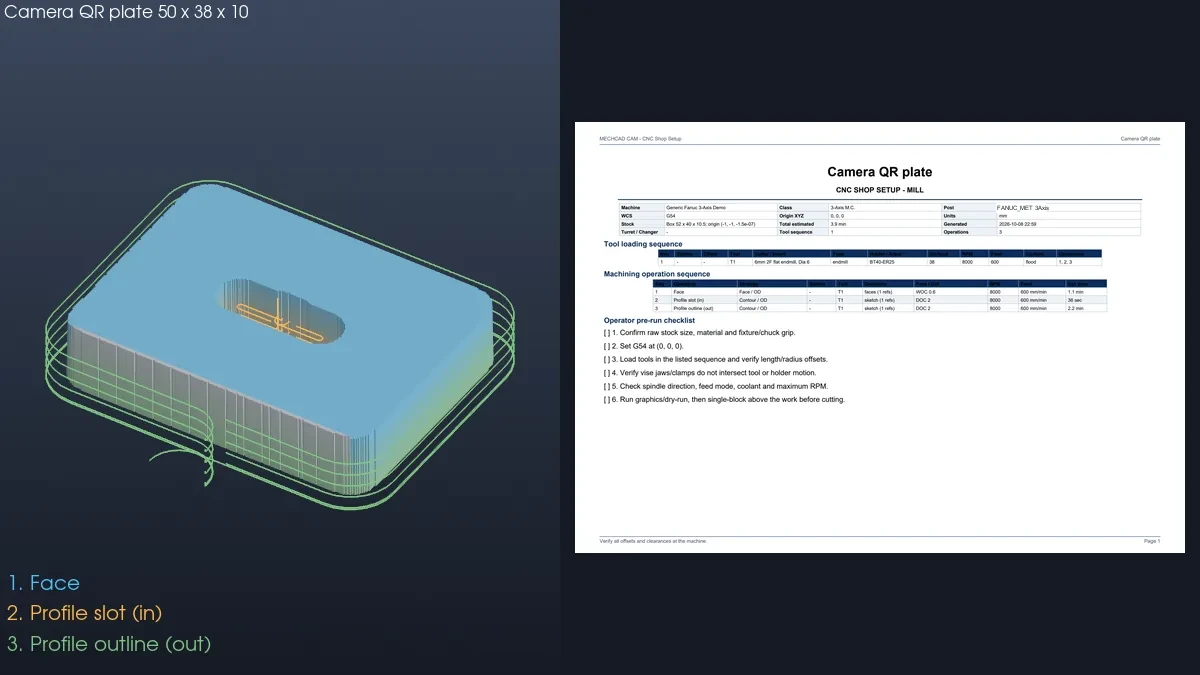
A 50 × 38 × 10 quick-release plate with a 7 mm slot for a 1/4" camera screw. Three operations, then the payoff: an NC file for the machine and a one-page setup sheet for the operator.
- Model a 50 × 38 plate with R4 corners, Extruded 10 mm. Draw a 20 × 7 slot in the middle (ends centred at X 18.5 and X 31.5, Y 19) and Extrude Cut it Through All.
- CAM › New Job › Mill Template. Set Support height (parallels) to 3. Add a Face. Add a Profile on the slot's top edge with Bottom / Floor Z −0.3, Lead arc radius 1, Lead-in length 0.5 and Lead-out length 0.5. Add a Profile on the outer top edge with Bottom / Floor Z −0.3.
- Simulate first. The estimated time is about 3.9 min.
- Click Output › G-code. The setup check warns that the demo machine profile is UNVALIDATED. Read the warning, then click Yes. Save as
camera_qr_plate.nc. You see Wrote 293 lines to …. - Click Shop PDF and save it (default name
<part name>_Shop_Setup.pdf). The page lists the machine (Generic Fanuc 3-Axis Demo), the FANUC_MET 3Axis post, the stock (52 × 40 × 10.5), the tool T1 and three operations: Face 1.1 min, slot Profile 36 s and outline Profile 2.2 min. It ends with the pre-run checklist.
Challenge: Change the Face cutter to T3 and print the PDF again. The tool loading table now has two tools.
Note: CAM is available only in MECHCAD Premium (and during the trial).